
Community Living Facilities
Overview
The Community Living Facilities feature in HCM is designed to support health campaigns in places where people live together for extended periods, such as schools, nursing homes, and refugee camps. It allows for both fixed-post and mobile delivery (transit post), making it easier to reach beneficiaries efficiently. This feature ensures that health interventions can be effectively delivered beyond traditional household-based approaches by enabling proper enumeration and adapting to different facility setups.
To learn more about the scope of Community Living facilities, click here.
Steps to Use Community Living Facilities
Boundary Selection
There are 3 scenarios
The user is assigned to work at a community living facility.
The user is assigned to work at both a community living facility and house-to-house.
The user is assigned to work from house to house.
Home Screen
- Separate navigation for community living facilities/ based delivery, transit post-based delivery, and household-based delivery.
- Clicking on the cards will navigate the user to the respective flows.
- The community living facilities/transit postcards will be available depending on the campaign requirements.
- The progress bar will cater to the number of beneficiaries covered in household + community living facilities (Transit post coverage will be monitored separately since this is not included in the microplan).

Search CLF screen
Clicking on the community living facilities icon navigates the user to the search page. This screen is as same as we have in the product.
A toggle is enabled to search the nearby CLF.
Search bar: All the loaded CLFs from the microplan can be searched here.
Filter (as same as in the product).
There can be multiple categories of Communal living facilities. For example:
Boarding schools
Military camps
Orphans
Retirement home
University campus
Prison
Police camps
Refugee camps

Search CLF screen with search results
When the user searches for the respective CLF, a card with the name of the CLF along with the proximity is displayed.
There is an action button to open the CLF.

Search CLF - Match not found
The behaviour of the screen remains the same as we have in the product, but when searching for a CLF and if a match is not found, then it shows the info message related to CLF.

Filter
This will be a multi-select filter. These are the filters that need to be added: Administered - intervention given Not Administered - Intervention pending Refused - Beneficiary declined intervention Ineligible -Beneficiary does not meet criteria Referred - Beneficiary directed to another facility or service When clear is clicked, all the selected filters must be removed.

CLF Location
Here we capture the location details of the CLF. This is where we capture geo-coordinates for the respective CLF.

CLF Details
In this screen, the type of structure of the facility is selected using the card layout. The number of rooms in the facility is also captured using the +/- counter.
Capturing these details will help to build the facility details in the registry and the data can be reused for campaigns such as Indoor Residual Spraying.

Individual Details
In this screen, the details of the individual residing in the facility are captured which include:
Name of the individual
ID type
ID number
Date of birth / Age
Gender
Mobile number
Scan voucher / ID

Clicking on the scan voucher will open the camera to scan the QR code on the voucher.

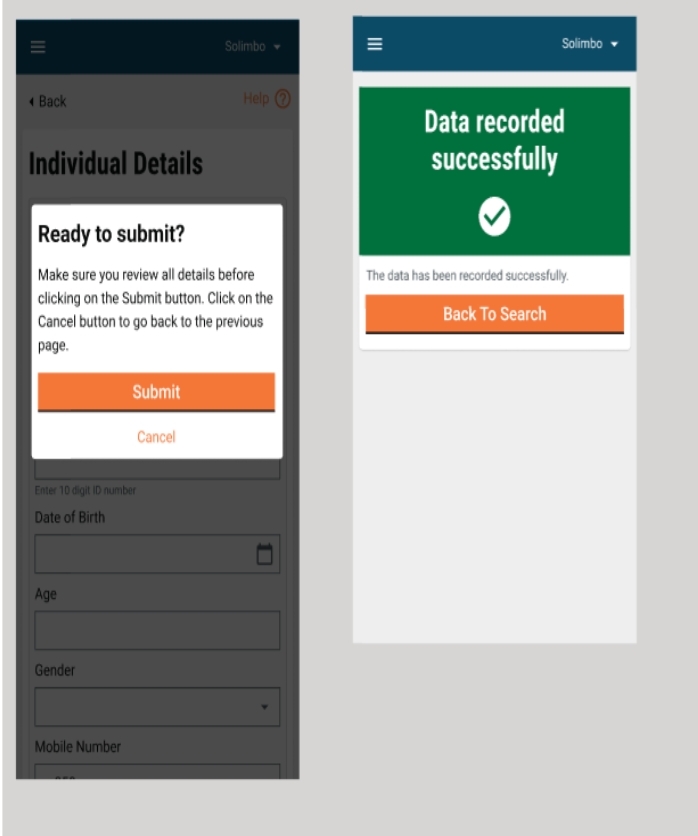
Once the voucher is Linked, clicking on ‘Submit’ will take the user to the Summary screen.
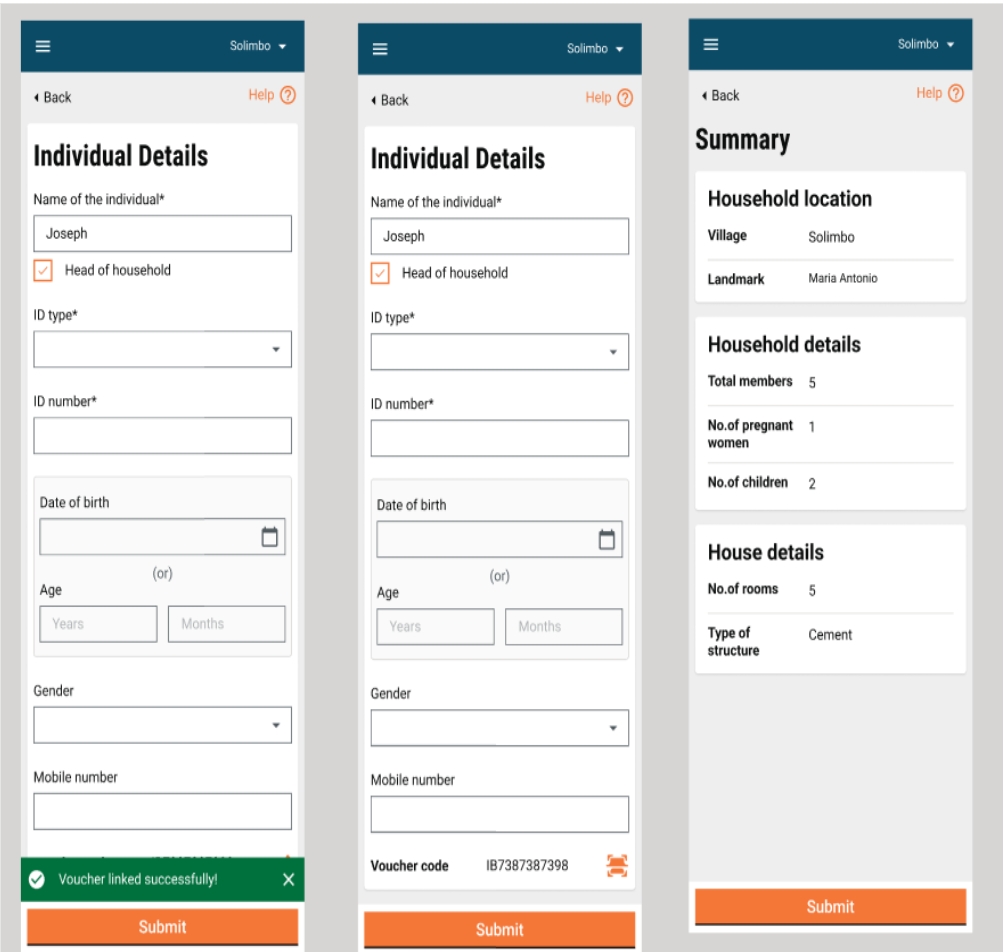
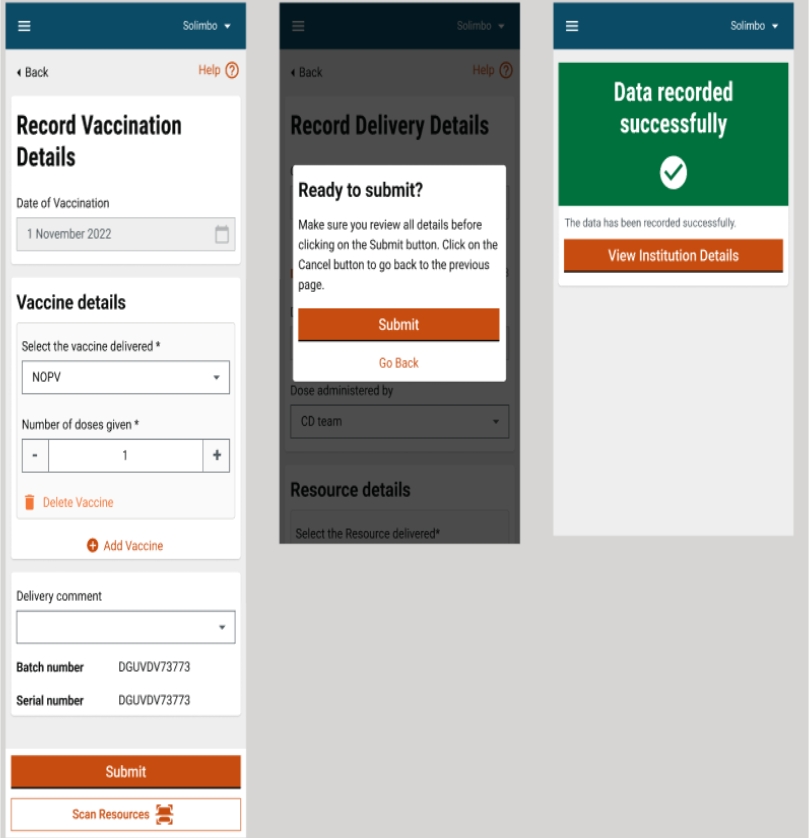
There is a warning pop-up message asking the user if they are ready to submit. Once submitted, a success toast message will be shown.
The data thus captured can be down-synced and used for another campaign in the future and can be also edited or updated if required
Search results with the filter
Once the beneficiaries are added to a facility, they can be filtered based on the administration status of the intervention. Once the filter is selected and the user clicks on “Apply Filter”, the beneficiaries screen is displayed with the applied filter displayed. The Individual filters can be removed from the same screen when clicking on the cancel button next to the respective applied filters.

Assess Eligibility
The Assess Eligibility screen opens when one clicks on the “Assess Eligibility” button. This screen will have a set of questions to assess the eligibility of the individual - this is particular to an individual campaign.

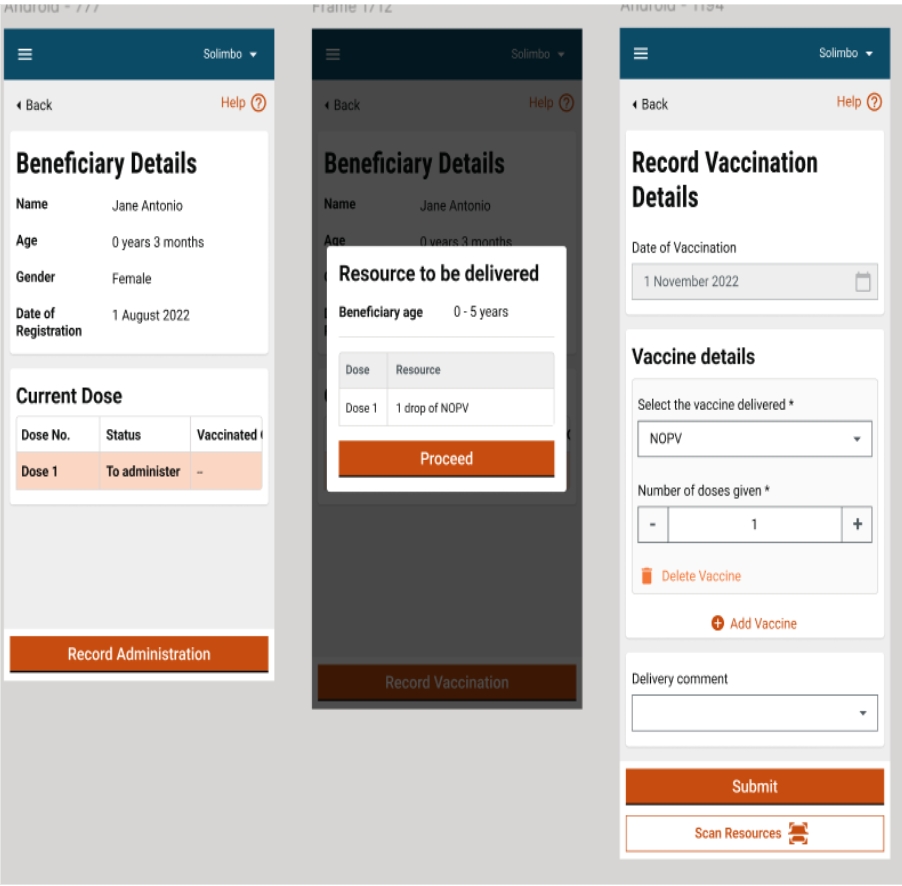
Deliver Intervention - Individual campaigns
The beneficiary details screen is opened when one cicks on “Record Delivery” where we record the administration for any type of individual-based campaign. For example: NTDs , SMC, and Polio.
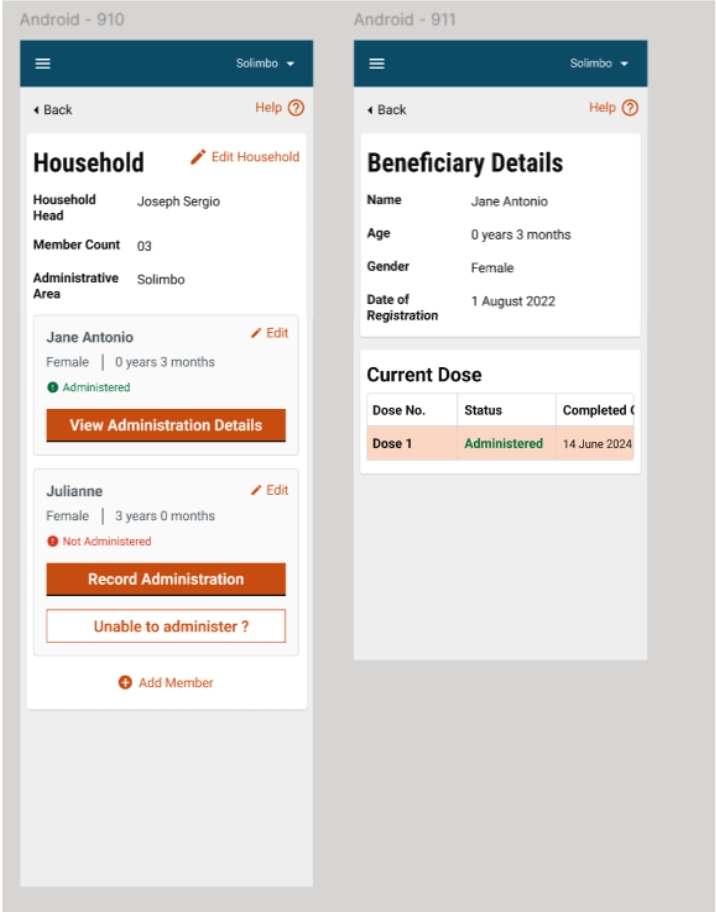
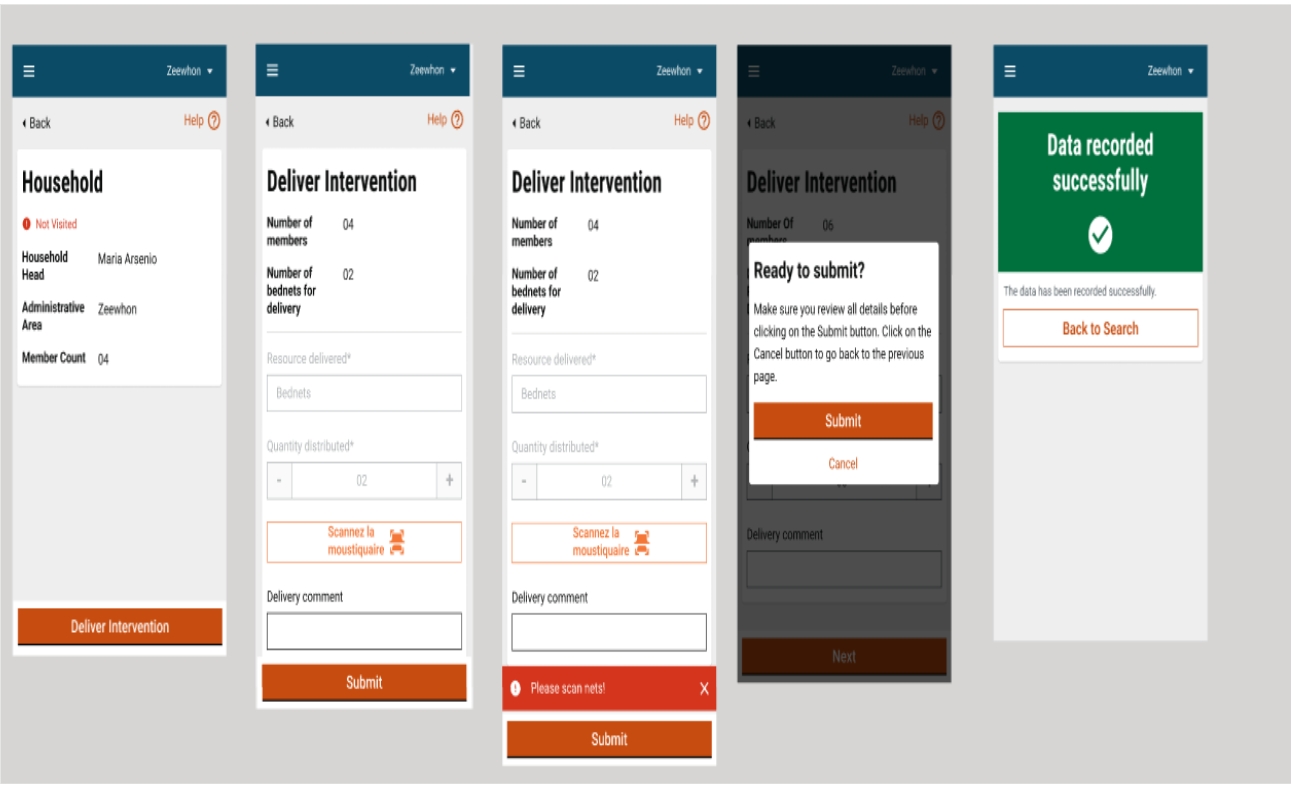
Deliver Intervention - household campaigns
The beneficiary details screen is opened when one clicks on “Record Delivery” where we record the delivery for any type of household-based campaign. For example: Bednet.
Summary Screen - CLF

Deliver Intervention - Data gets pre-loaded from microplan
Click on the delivery card, and search for the CLF with the name. Since all the data would be pre-loaded, when down-synced, we will get the necessary information for the respective CLFs.
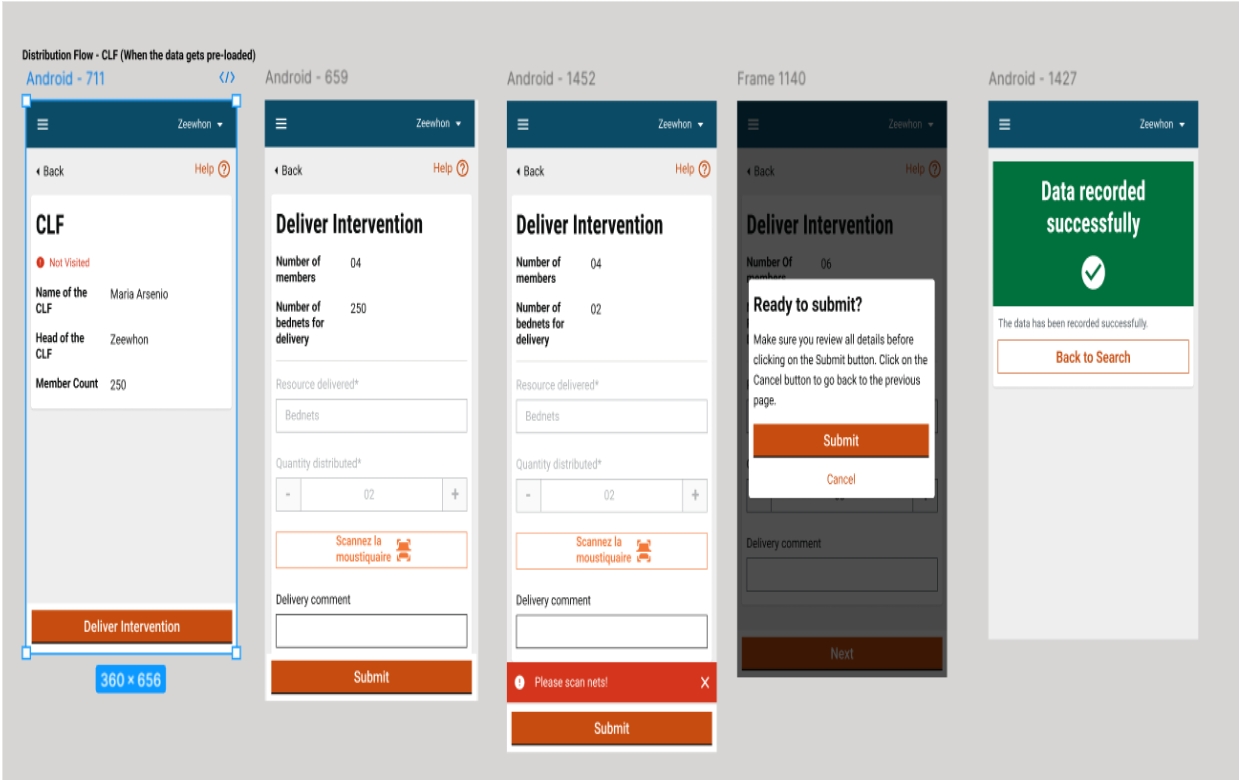
Deliver Intervention - When the data is not pre-loaded
When the data is not pre-loaded from the microplan, then the delivery will depend on the registration, and the delivery screens will remain the same.
Transit Post
- The KPI indicators show the deliveries completed for the current data and cumulative for that user. The following details are captured:
Type of transit post (master data)
Name of transit post (user input)

Scan resource
The resource is scanned using the scanner feature. The scan feature should be configurable such that for interventions where any codes are not available, the screen will jump to the delivery page without scanning.

Manual entry
Enter the resource code if the scan does not work due to any reason.

Deliver Intervention
- The screen shows:
The number of deliveries for the transit post selected
The transit post details
The resource to be delivered
Eligibility conditions
Resource details scanned
Clicking on record delivery will count toward the delivery of one beneficiary. The process is repeated until all beneficiaries are administered. Clicking on close delivery will complete the deliveries for the selected transit post.

Upon successful scan, the user must see a flash acknowledgment screen, which must be available for a configurable duration, and must take the user back to the "Vaccination Details" screen. This process will be repeated until the user closes the delivery.

Last updated
Was this helpful?