Raising Complaints
An illustrative guide to using the Complaints Module (Mobile)
Users can file a complaint using the HCM app. There are a few assumptions:
Not all complaints will be logged using the complaints module. Users may prefer raising complaints on WhatsApp groups/calls, and may not be registered in the system.
Complaints are most likely to be logged by users on behalf of other users (Most common use case: Supervisors raising complaints on behalf of users).
User Roles
Registrar
Create and view complaints.
Registrars can raise technical complaints on the application
Field Supervisor
Create and view complaints.
Assist the frontline teams and raise the issues communicated by them on the application
Supervisor
a. Create and view complaints.
b. Resolve complaints, re-assign complaints back to the helpdesk, and reject complaints.
Monitor the overall campaign and provide assistance for the issues raised by the field teams
Helpdesk user
a. Create and view complaints.
b. Resolve complaints, assign complaints, and reject complaints.
Helpdesk users are the support team established to provide assistance throughout the campaign.
Users Raising Complaints
After logging into the application, the user lands on this screen which displays daily performance (number of households registered). The progress bar must reset daily at 00:00 hours and start from 0 registrations. The action buttons related to the beneficiary are present, which include:
Beneficiaries
View reports
Sync data
Call supervisor
Complaints
Complaints
When the user clicks on the complaints, she is navigated to the “My Complaints” screen, which consists of two actions:
File a complaint (primary action): Clicking on this must open the complaint type screen.
View previously logged complaints.

File Complaint Workflow
Complaint Type
When the user clicks on file a complaint, the complaint type screen appears. The user must select the type of complaint from the list, which must be configurable (to be configured during implementation as per program requirements).
There is a ‘Next’ button at the bottom of the screen, clicking on which, the user is navigated to the complaint details screen.

Complaint Details
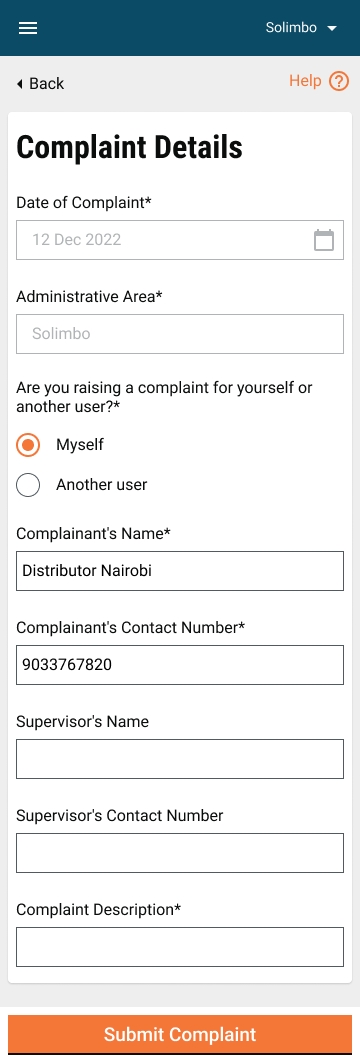
Once the user has selected the type of complaint and clicked on ‘Next’, this screen appears, where they need to provide the complaint details.
The date field is auto-captured by the system, which must be non-editable.
The administrative area is also auto-captured but it is editable. It is editable in case the user is creating the complaint on someone’s behalf. The dropdown displays a list of boundaries that are assigned to the user.
The user needs to select whether she is raising a complaint for herself or on behalf of another user.
If the user wants to raise a complaint for herself, then she must provide the following details:
Name (must be populated if already available in the user’s profile else must be blank).
Contact number (must be populated if already available in the user’s profile else must be blank).
Supervisor’s name and contact number.
If the complaint is raised on behalf of another user, then her details must be captured in the above fields. The user has the option to upload images describing the issue along with a text-based description. If the user wants to change the type of complaint, they can click on the ‘Back’ button and return to the previous screen.
After filling in all the details, the user needs to click on the ‘Submit’ button to file the complaint.


Confirmation Screen
When the user clicks on the submit button after providing all the complaint details, the confirmation screen appears, which provides information on whether the complaint has been submitted or not.
If the complaint has been submitted, then it must show the message to sync the data for generating the complaint number. There must be a back to home button below the message. When the user clicks on it, she must be navigated to the home screen.
If the complaint has not been submitted, then there must be two buttons available; Retry and Back to Home.

Was this helpful?